အဆင့်မြင့် ခရီးသည်ပို့ဆောင်ရေး
")
")
How to buy with
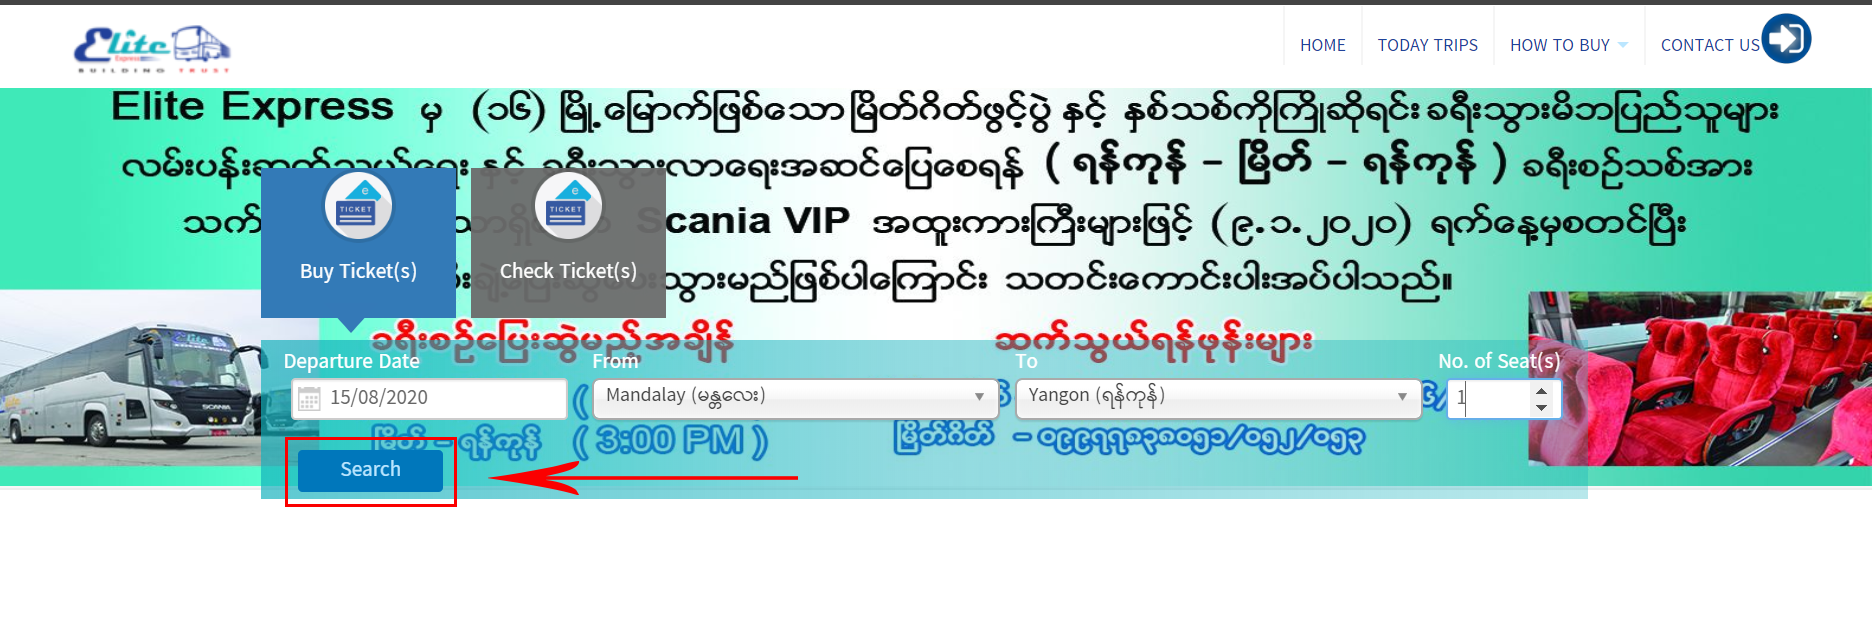
၁။ Departure Date,From, To, No. of Seat(s) များ ရွေးချယ်ဖြည့်သွင်းပြီး Search ကို နှိပ်ပါ။
1. Please Select Departure Date,From, To, No. of Seat(s) in Bus Ticket(s) form and click on Search button to find trip which you want to travel.
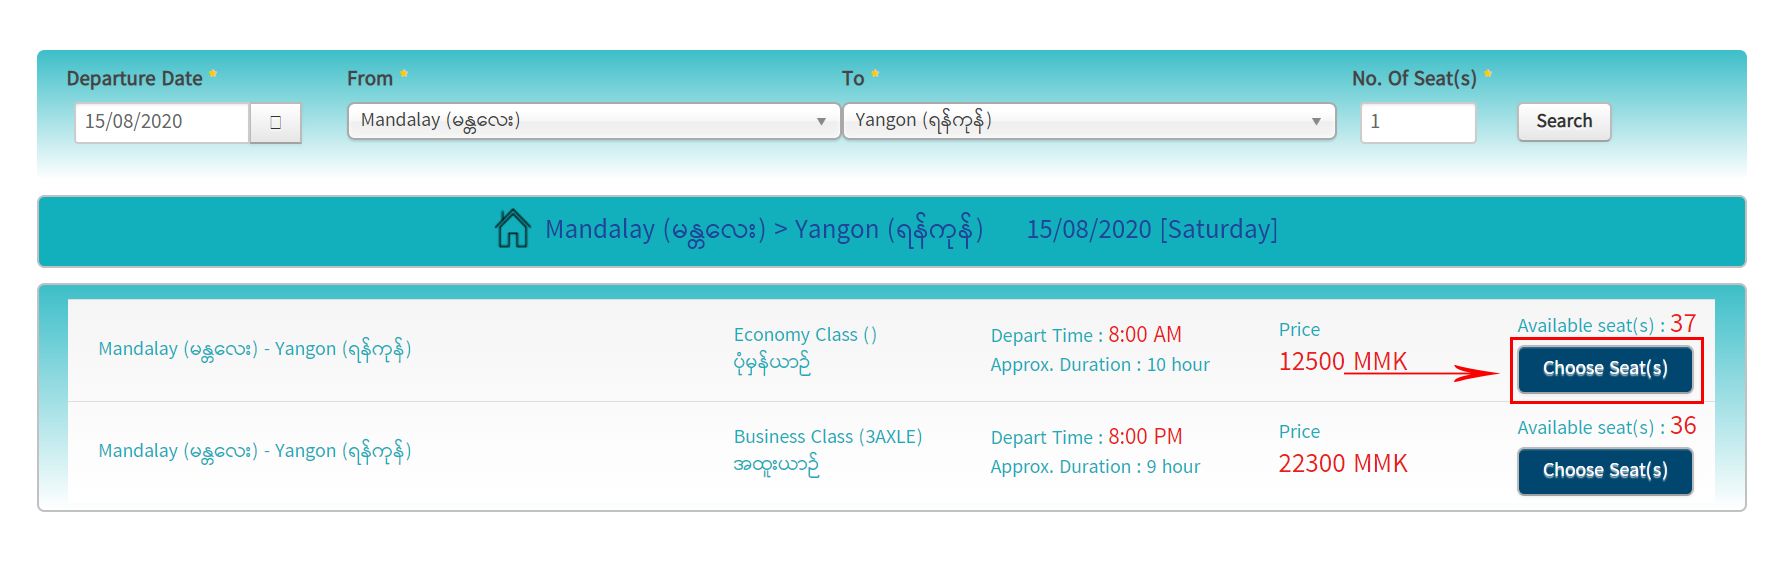
၂။ လက်မှတ်ဝယ်ယူရန် မိမိသွားရောက်လိုသော ခရီးစဉ်အချိန်ကို ရွေးချယ်ပြီး Choose Seat(s) ကို နှိပ်ပါ။
2. Please select one of trip which you desire to go, then click Choose Seat(s).
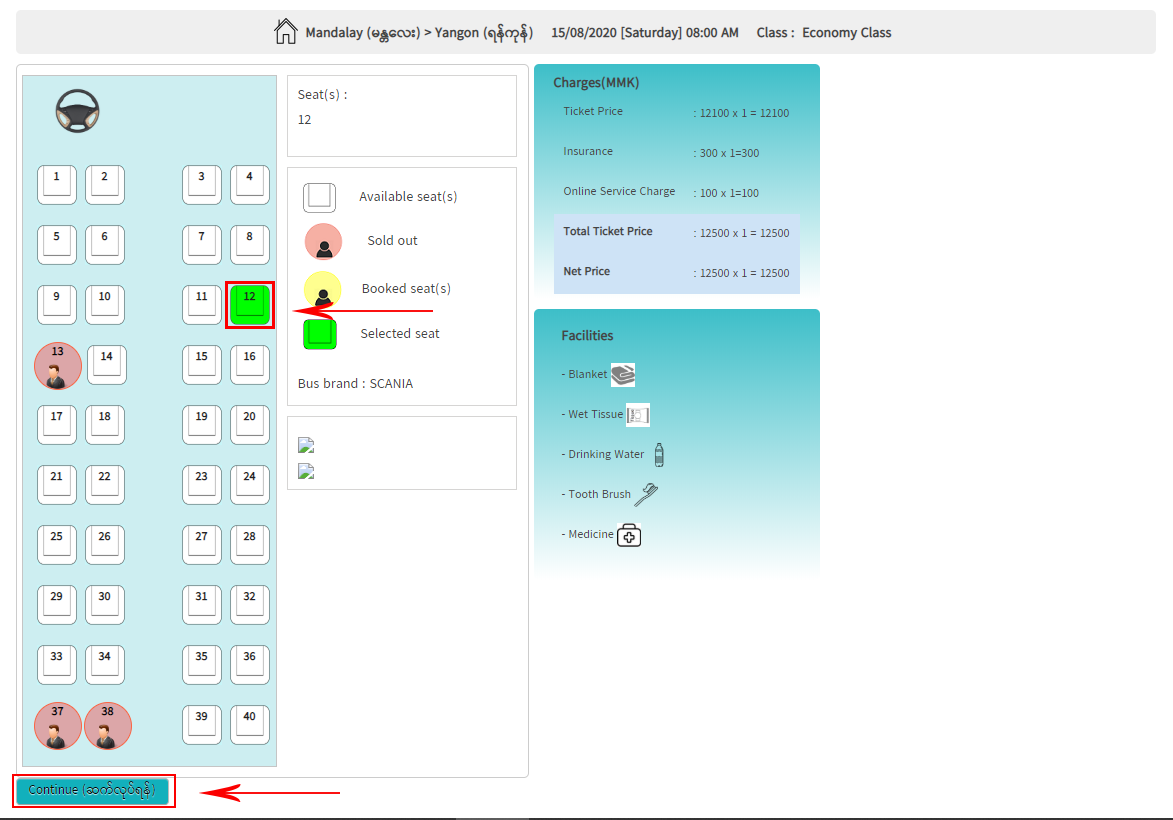
၃။ ဝယ်ယူနိုင်သော အဖြူရောင်ခုံများမှ မိမိကြိုက်နှစ်သက်ရာ ခုံကိုနှိပ်ပြီး Continue ကိုနှိပ်ပါ။
3. You can select desire seat No. from avaliable seats colored with white blocks. Then, click on Continue to continue.
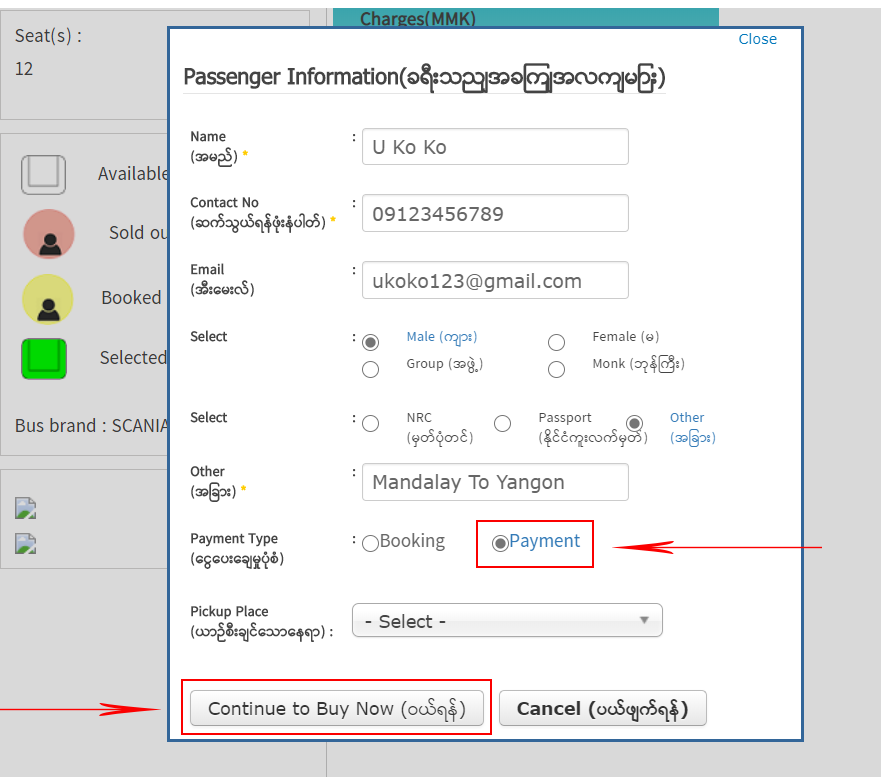
၄။ ခရီးသည် အချက်အလက်များဖောင်တွင် လိုအပ်သော အချက်အလက်များကို ဖြည့်သွင်းပြီး ငွေပေးချေမှုပုံစံတွင် Payment ကို ရွေးချယ်ပေးရပါမည်။ email သို့ လက်မှတ် ပို့စေလိုပါက မှန်ကန်သော email ကို ဖြည့်သွင်းပါ။ ထိုနောက် Continue to Buy Now ကို နှိပ်ပါ။
4. After filled necessary information at Passenger Information, please choose Payment options in Payment Type. If you filled correct mail address in email field, we’ll sent e-ticket to your email. Then, click on Continue to Buy Now button.
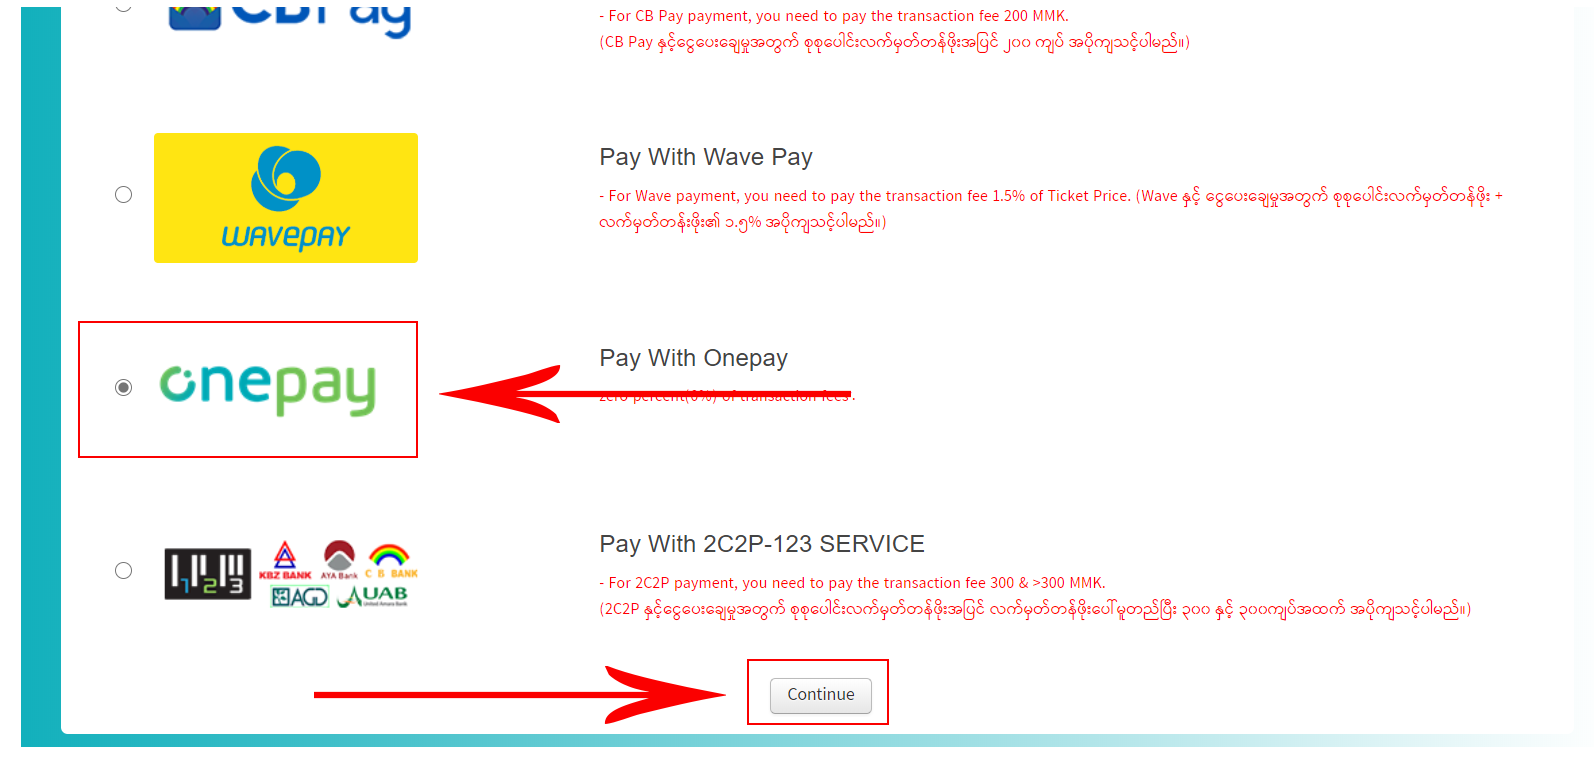
၅။ OnePay အားရွေးချယ်၍ click နှိပ်ပေးပြီး "Continue" အား ထပ်မံနှိပ်ပေးပါ။
5. Please select and click OnePay and then click "Continue".
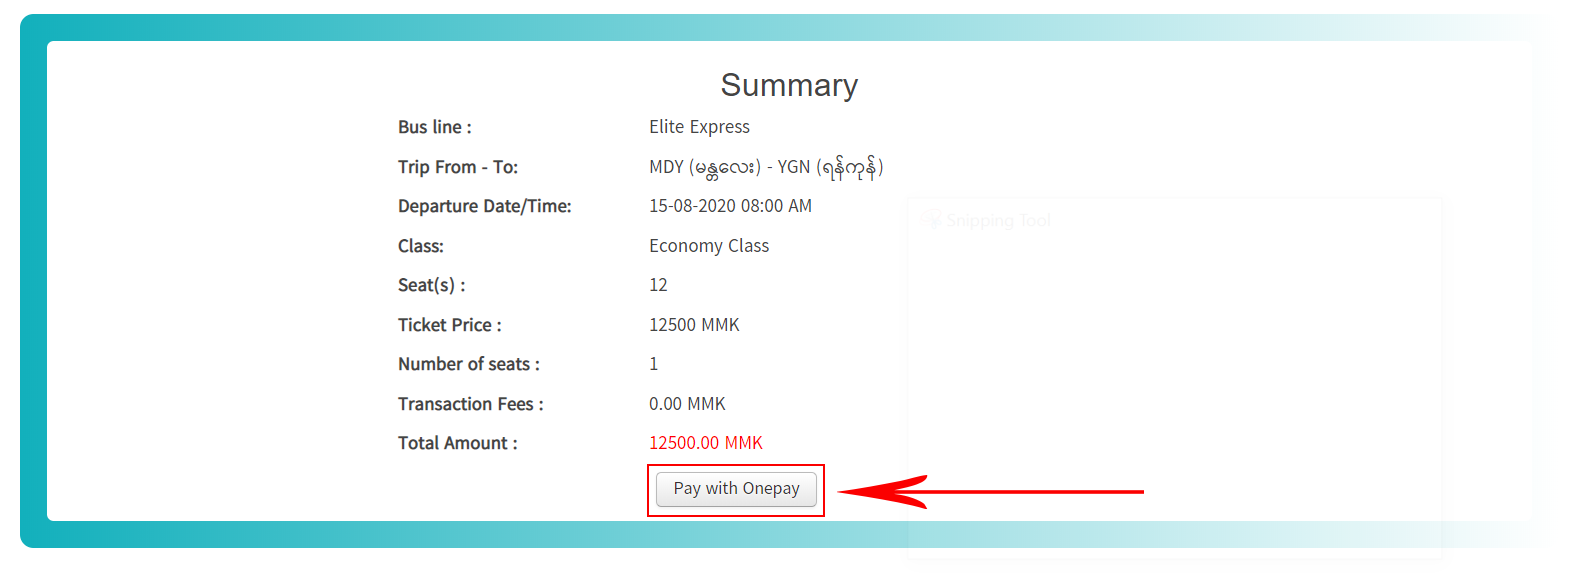
၆။ မိမိထည့်သွင်းခဲ့သော အချက်လက် အကျဉ်းချုပ်အား ထပ်မံစစ်ဆေးပြီးနောက် "Pay With OnePay" ကို နှိပ်ပေးပါ။
6. Kindly check your provided information summary and then click "Pay With OnePay".
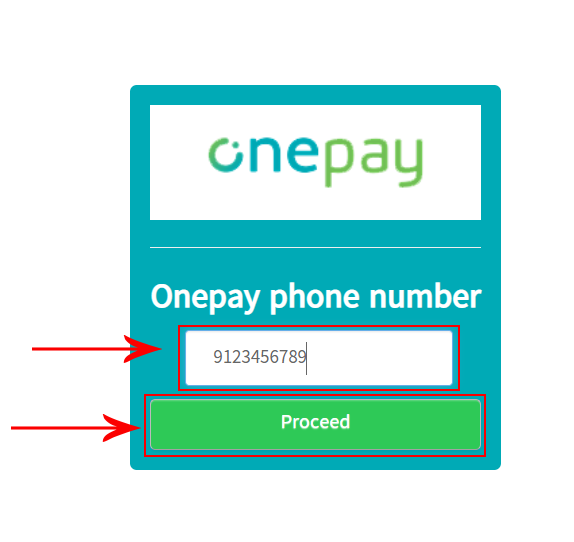
၇။ မိမိ OnePay account ပြုလုပ်ထားသော ဖုန်းနံပါတ်အား ပုံတွင်ဖော်ပြထားသည့်အတိုင်း ၉ မှစ၍ ရိုက်နှိပ်ပြီးထည့်သွင်းပေးပါ။ (ဥပမာ သင်၏ဖုန်းနံပါတ် "09791234567" အစား "9791234567" သာ ရိုက်ထည့်ပေးပါရန်။)
7. Please insert your OnePay account phone number as shown in figure. (Eg, Let your phone number is "09791234567", you just need to push "9791234567")
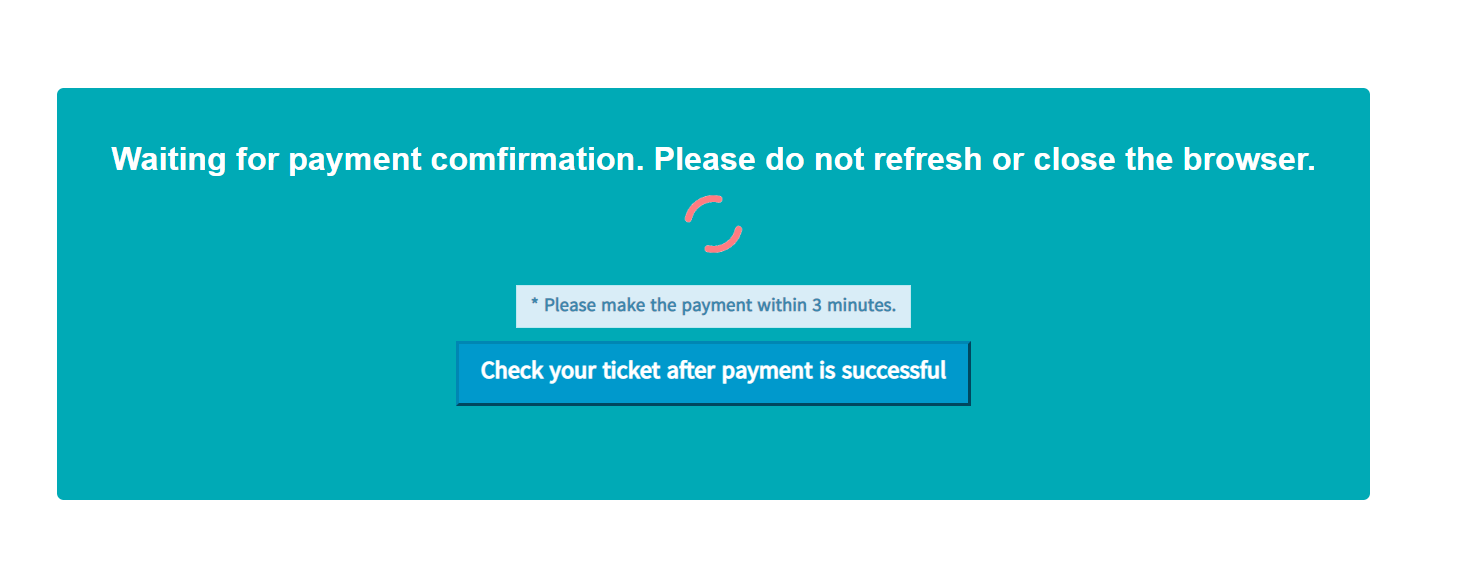
၈။ ထို့နောက် အောက်ပါပုံတွင် ဖော်ပြထားသည့်အတိုင်း ပေါ်လာပါက ယခုရောက်ရှိနေသော Browser အား ပိတ်လိုက်ခြင်း သို့မဟုတ် refresh ပြုလုပ်ခြင်းမလုပ်ဘဲ မိမိ၏ဖုန်းအတွင်းရှိ OnePay application ထဲသို့ဝင်ရောက်ပေးပါ။ (ဖုန်းသီးသန့်အသုံးပြုများအနေဖြင့် ဖုန်း၏ Home ဖြင့် ခေတ္တ ထွက်ပြီး OnePay application ထဲ ဝင်ပေးပါ)
8. After that when there is a view appeared as shown in following figure, please go to your Onepay application in your mobile phone without closing for refreshing current browser tab. (For mobile only use, click mobile's Home button and enter OnePay application)
မိမိဖုန်းအတွင်းရှိ Onepay Application အား အသုံးပြုပုံ လမ်းညွှန် (Instructions of using Onepay application in your mobile phone)
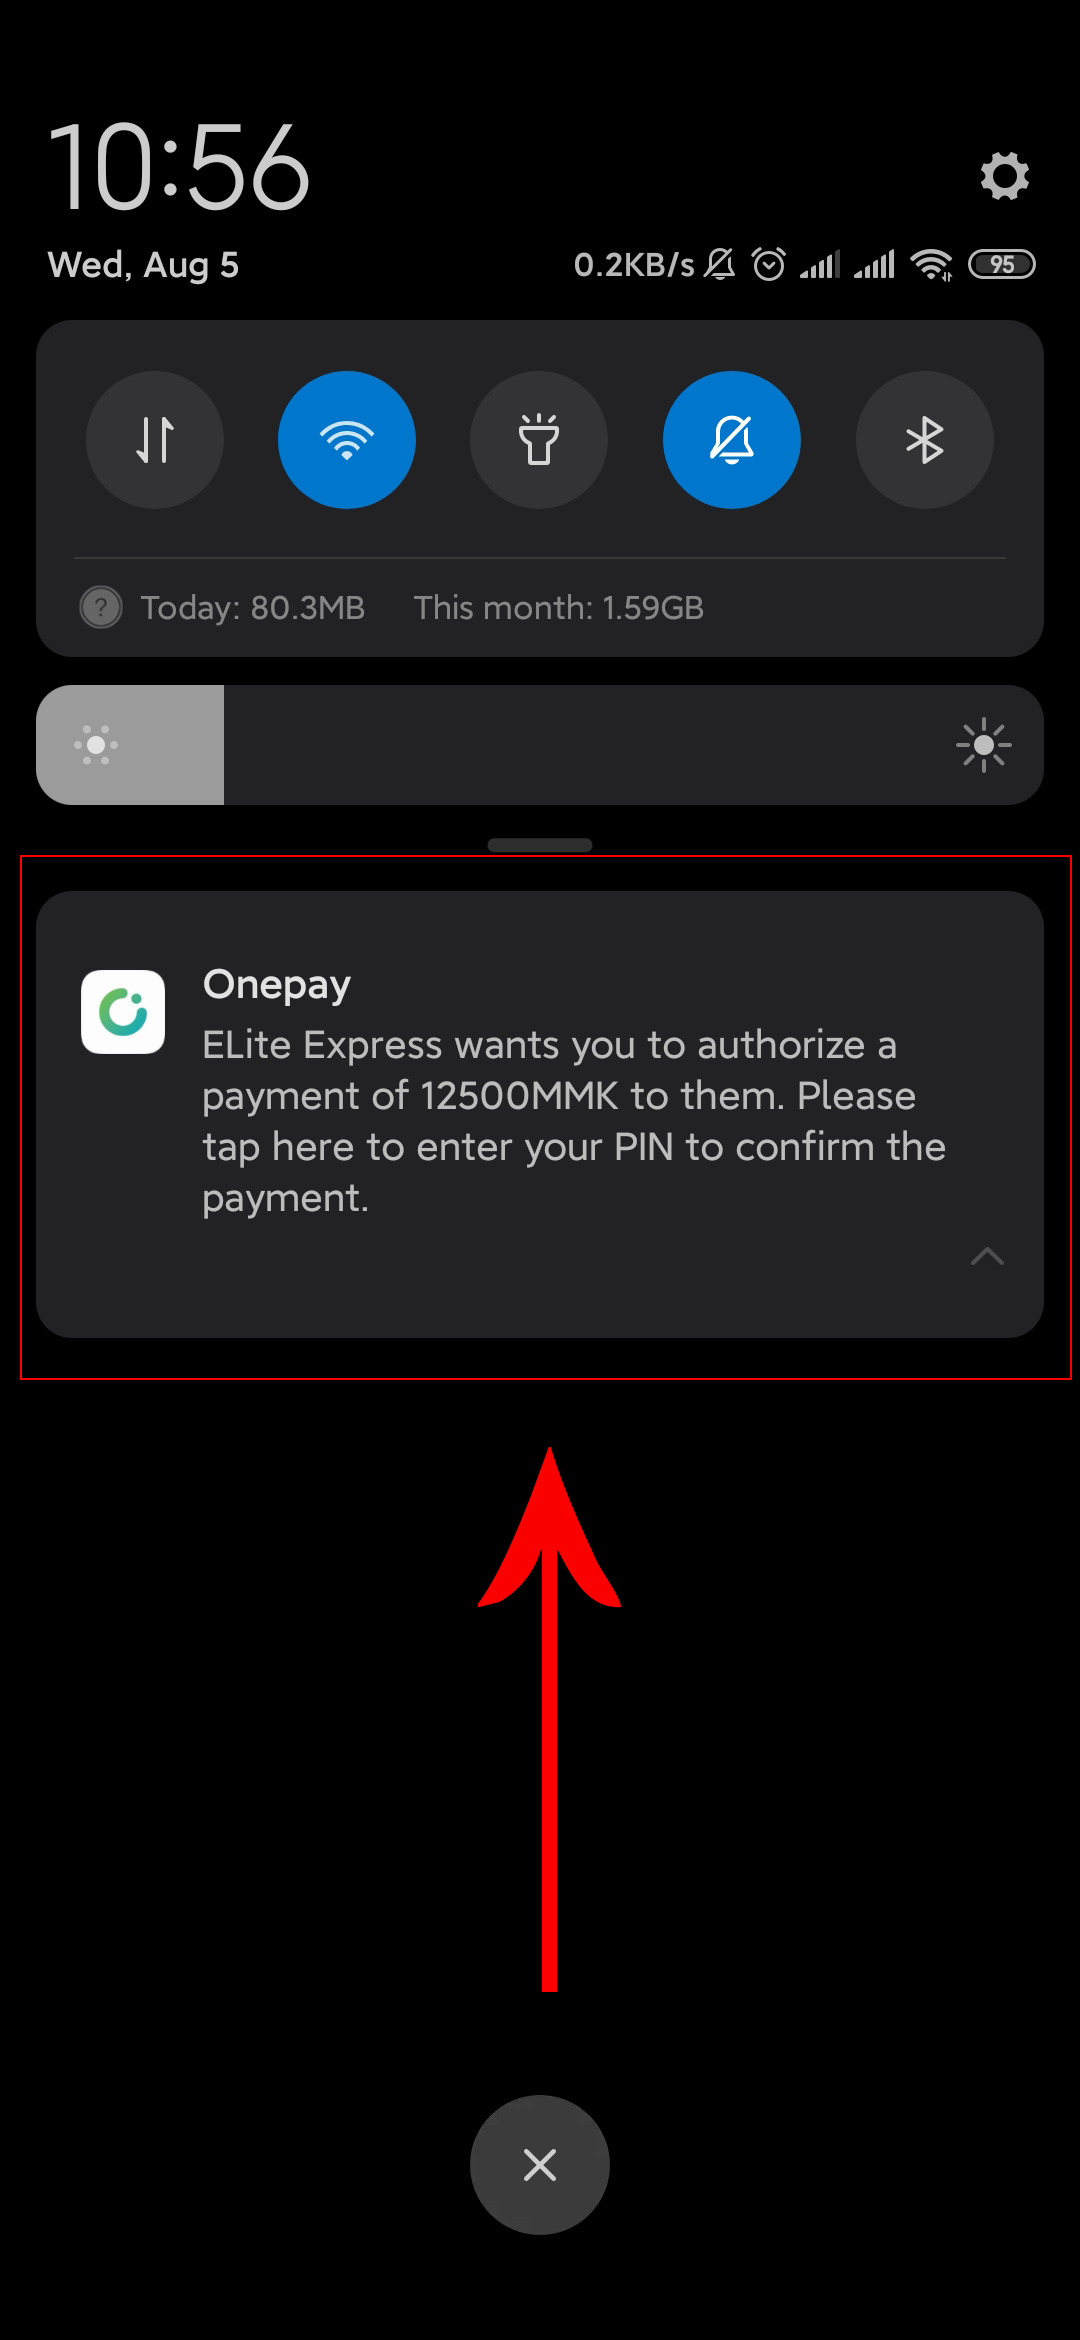
၈.၁ | ပထမ အဆင့်အနေဖြင့် Onepay မှ မိမိဖုန်းသို့ ငွေပေးချေရန် အသိပေးစာသား ပေးပို့မည်ဖြစ်ပြီး ယင်းစာသားလေးအား နှိပ်ပေးပါ။
8.1 | As frist step, please click OnePay's notification message which sent lately.
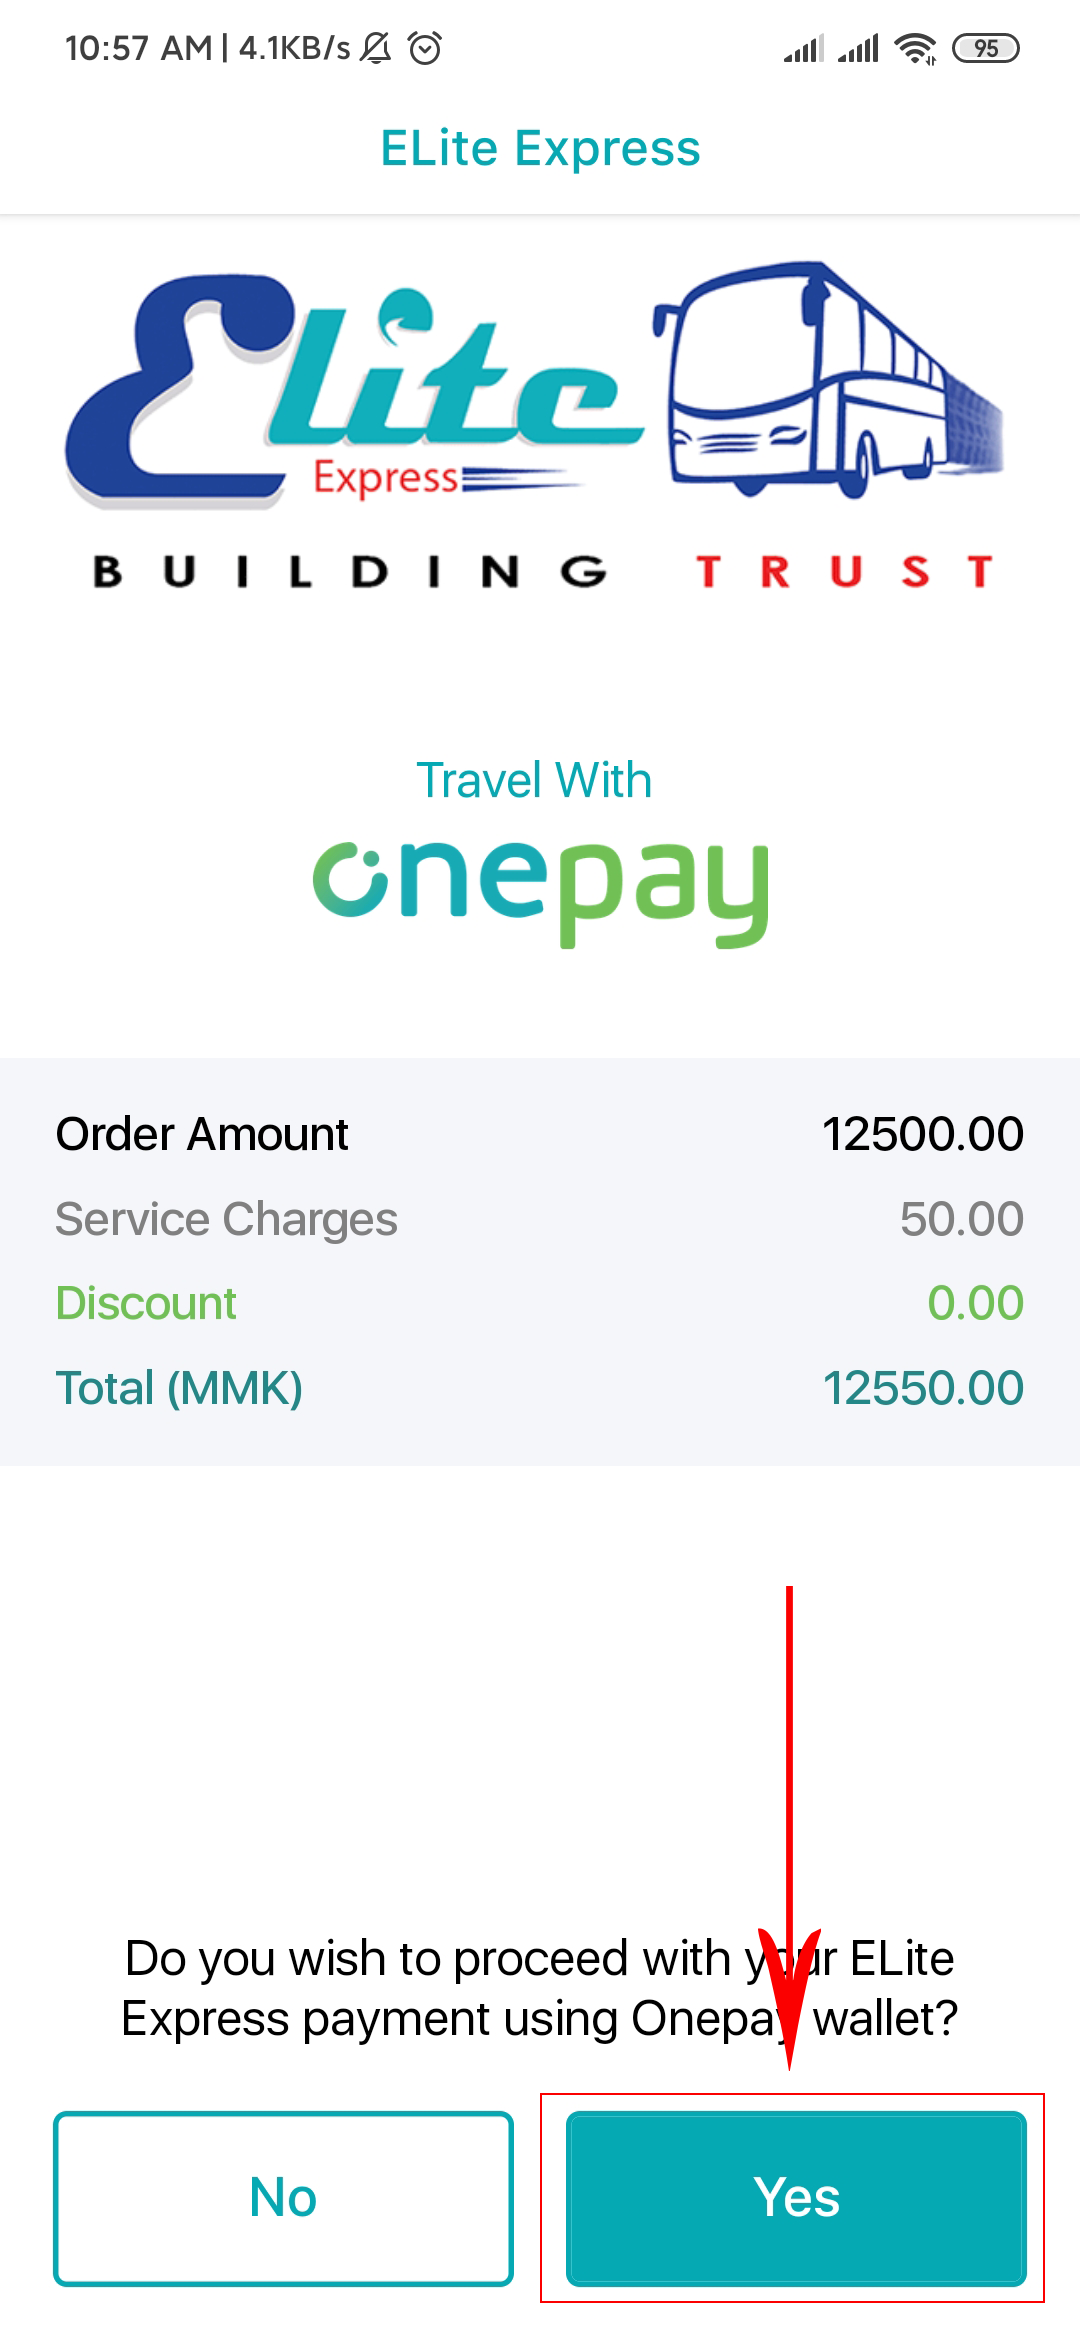
၈.၂ | ဒုတိယအဆင့် အနေဖြင့် ပုံတွင်ပြထားသည့်အတိုင်း "Yes" ကို နှိပ်ပေးပါ။ (Application အား မူလက အသုံးပြုထားခြင်းမရှိပါက ကနဦး Passcode တောင်းမည်ဖြစ်ပြီး မိမိ၏ Passcode အား ရိုက်ထည့်ပေးပါ။)
8.2 | As second step, please click "Yes" as show below.(If you haven't open the application already, it will request passcode and authorize it.)
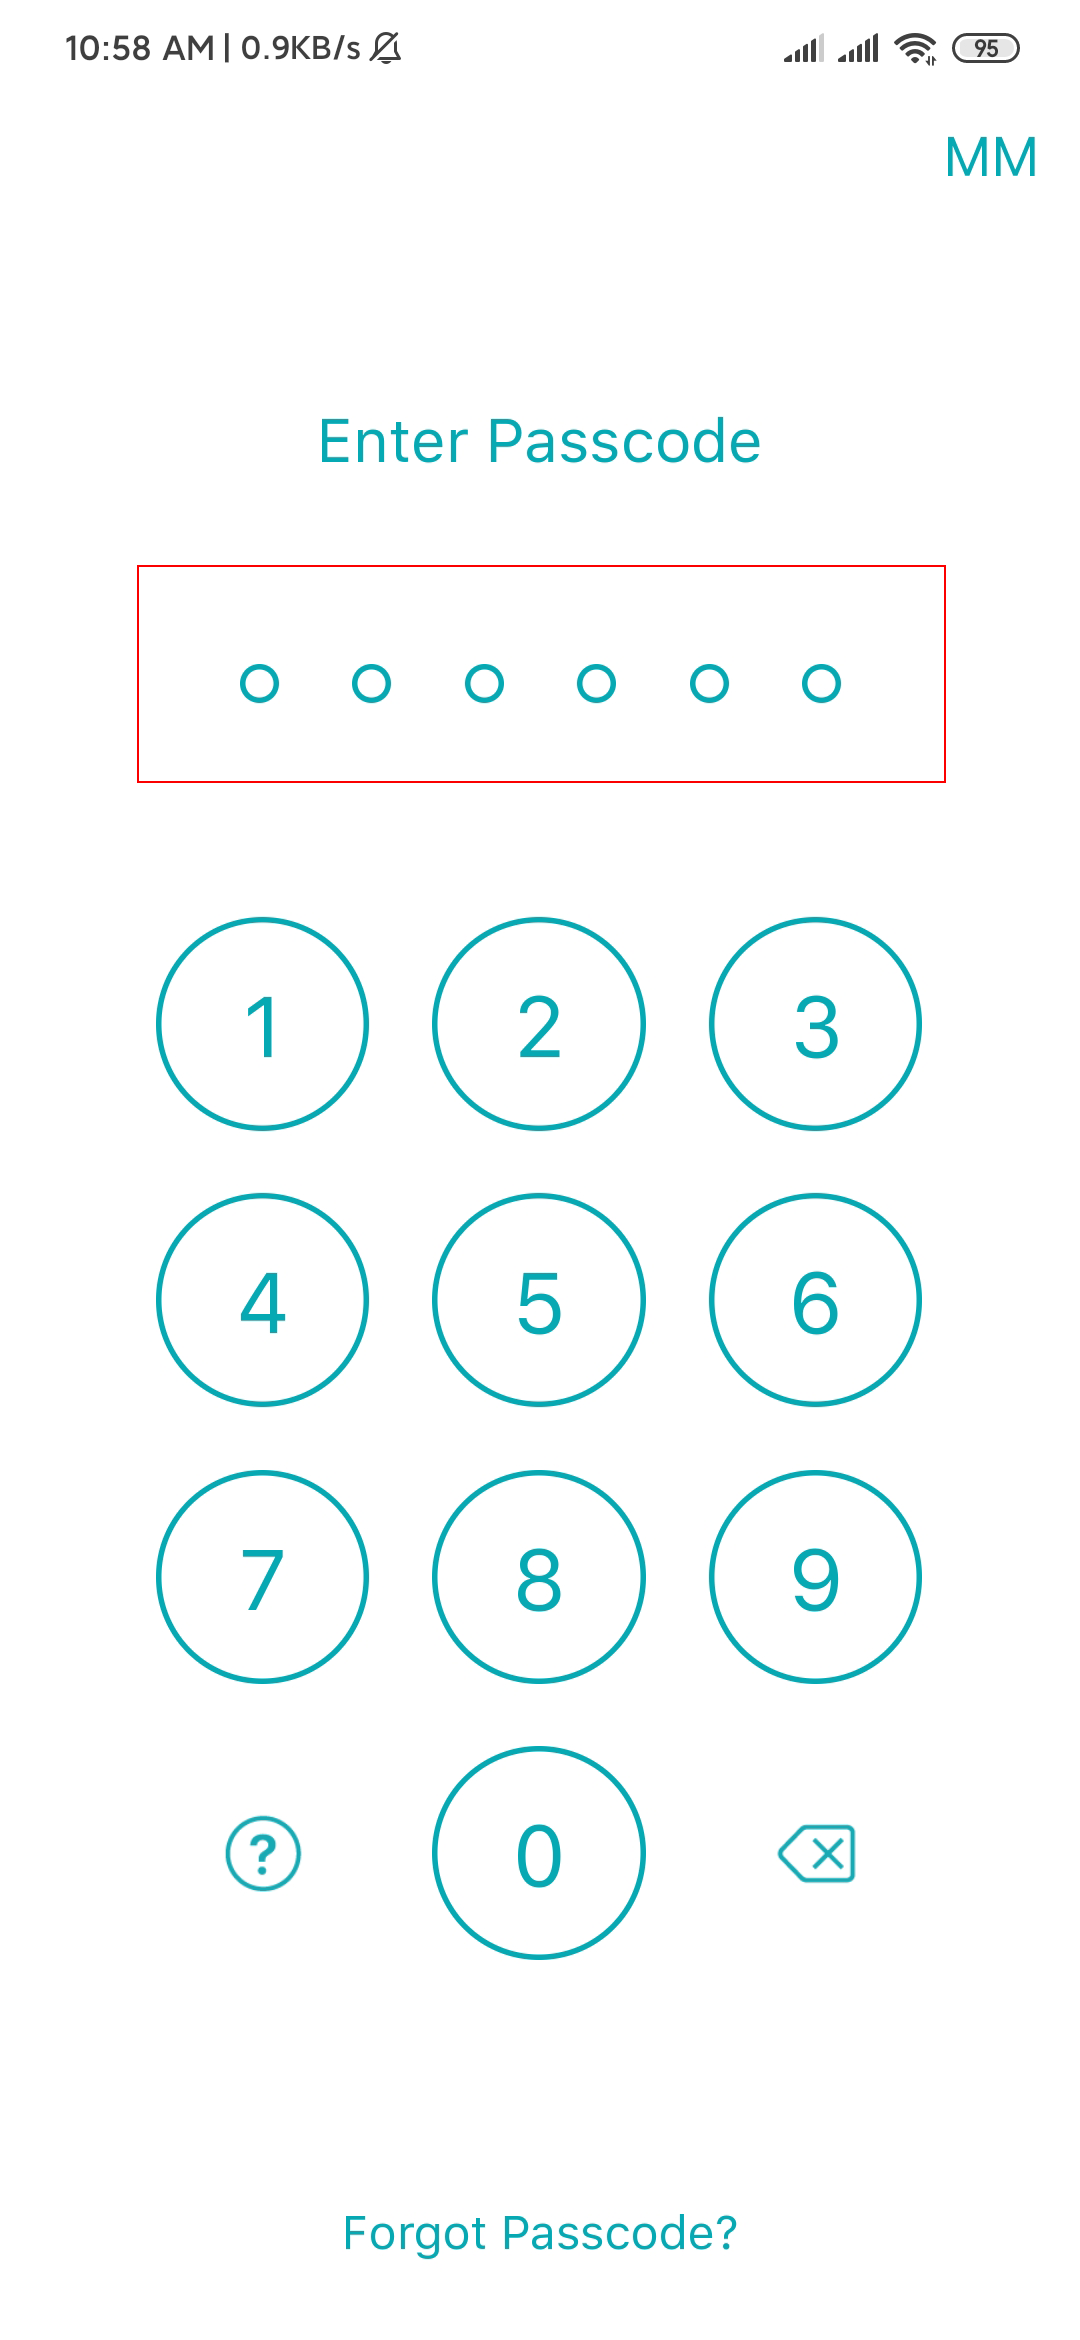
၈.၃ | တတိယအဆင့် အနေဖြင့် အောက်ပါပုံတွင် ဖော်ပြထားသကဲ့သို့ မိမိ Onepay အကောင့်၏ Passcode အား တောင်းခံမည်ဖြစ်ပြီး Passcode ၆ လုံးအား ရိုက်ထည့်ပေးပါ။
8.3 | As third step it will request your Onepay account's six passcodes and please type it as shown below.
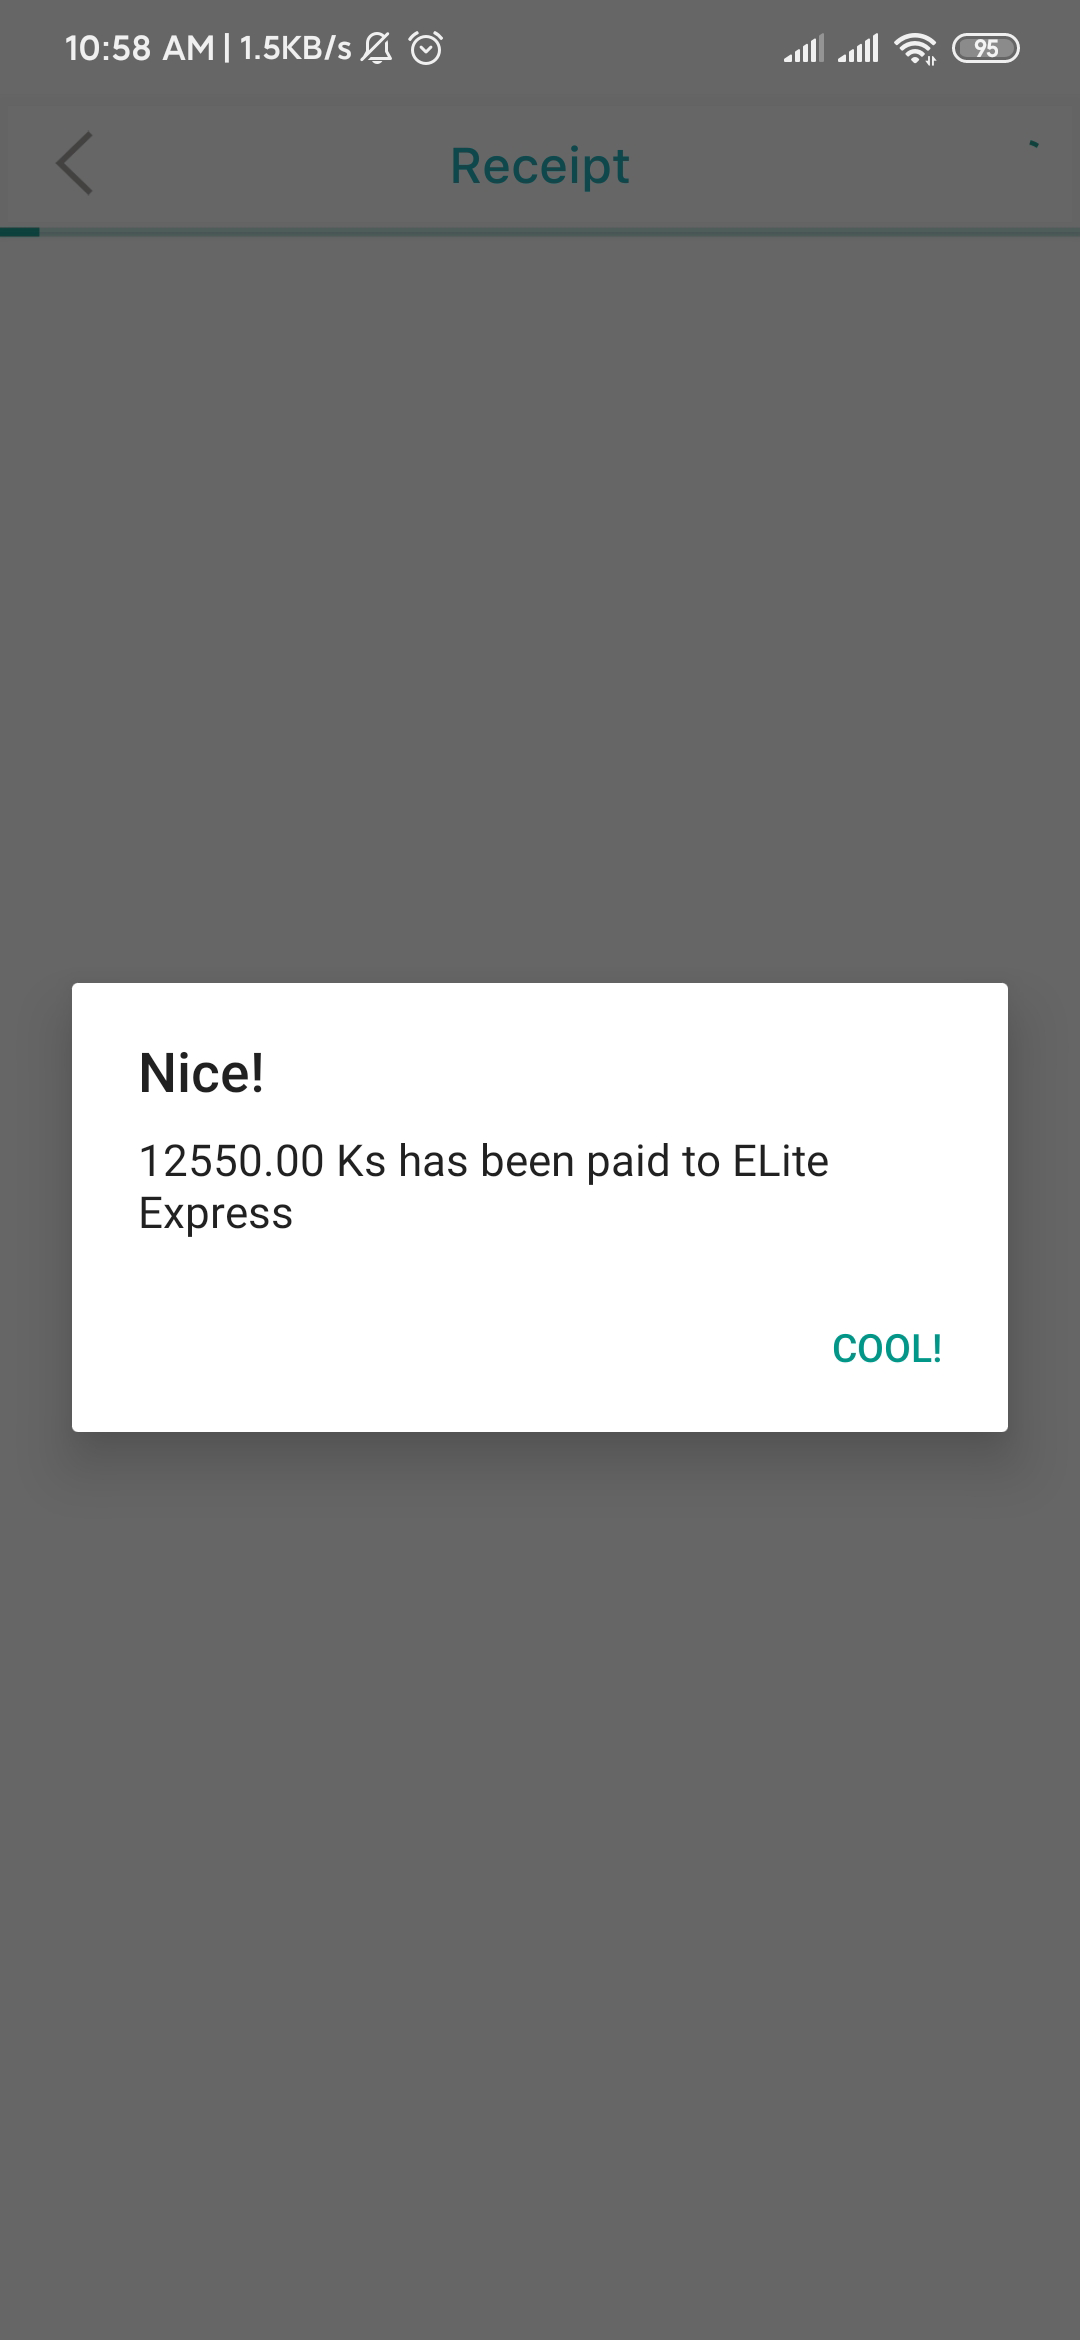
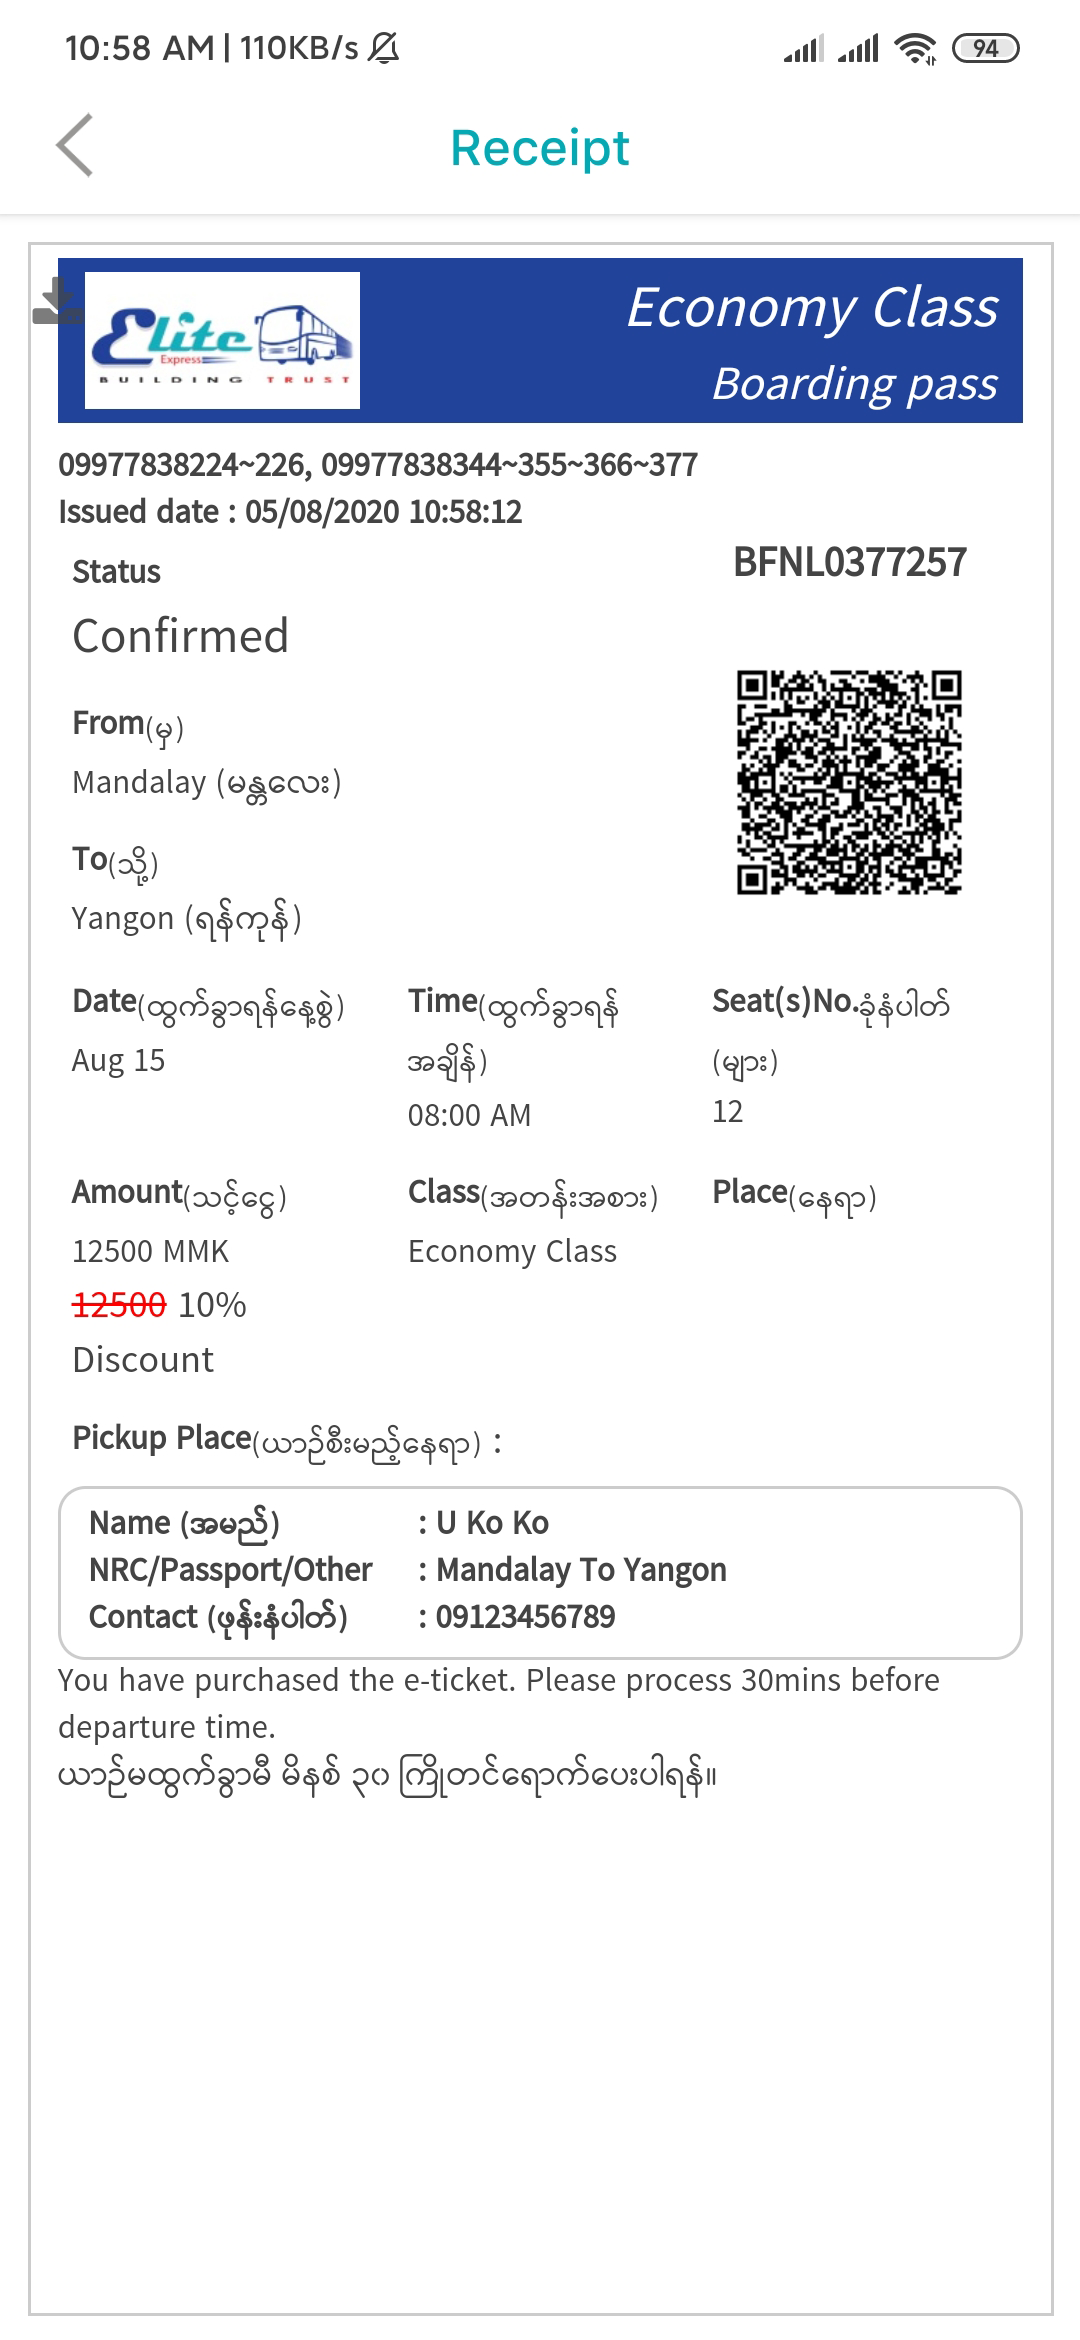
၈.၄ | နောက်ဆုံးအဆင့် အနေဖြင့် လက်မှတ်ဝယ်ယူ ပြီးစီးကြောင်း အသိပေးစာသားပေါ်လာမည်ဖြစ်ပြီး မိမိ ဝယ်ယူထားသော လက်မှတ်ကို ပြပေးမည်ဖြစ်သည်။ ထို့နောက် လက်မှတ်အား screenshot ပြုလုပ်ပြီး သိမ်းဆည်းပေးပါ။
8.4 | As last step the ticket purchasing successfully message will appear and the ticket will show and then please keep it using screenshot.
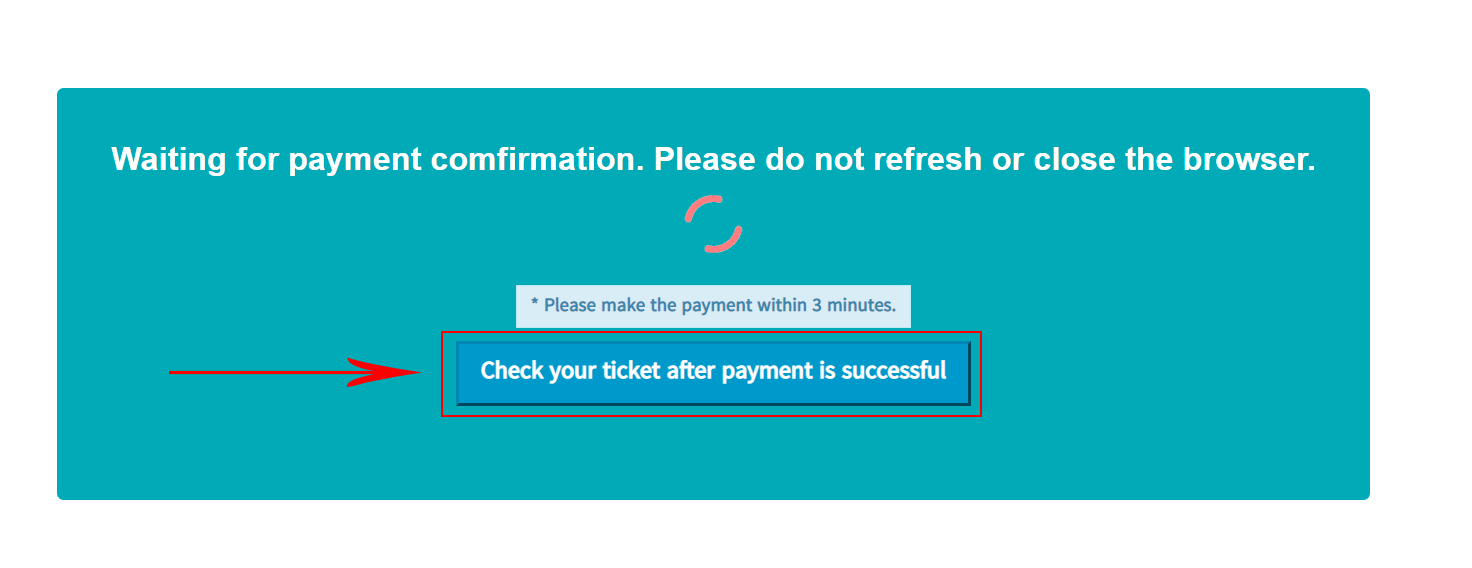
၉။ ဖုန်းသီးသန့် အသုံးပြုသူများ အနေဖြင့် ငွေပေးချေမှု အောင်မြင် ပြီးဆုံးသွားပါက မိမိ Home ဖြင့် ထွက်ခဲ့သော Browser အား ပြန်လည် ရှာဖွေပြီး ပြန်လည်ဝင်ရောက်ပေးပါ။ ထို့နောက် အောက်ပါပုံတွင် ပြထားသည့်အတိုင်း "Check your ticket after payment is successful" ကို နှိပ်ပေးပါ။ ကွန်ပျူတာမှတစ်ဆင့် ဝယ်ယူထားသူများမှာလည်း အလားတူပင် ဖွင့်ထားခဲ့သော Browser သို့ပြန်လည်သွားရောက်ပြီး "Check your ticket after payment is successful" ကို နှိပ်ပေးပါ။
9. For mobile only use when the payment was finished successfully, find the Browser in recent activities which you out by Home button and re-enter again. Then click "Check your ticket after payment is successful" as shown in figure below. Likewise for the user who buy the ticket redirect from PC, return to your Browser tab and click "Check your ticket after payment is successful".
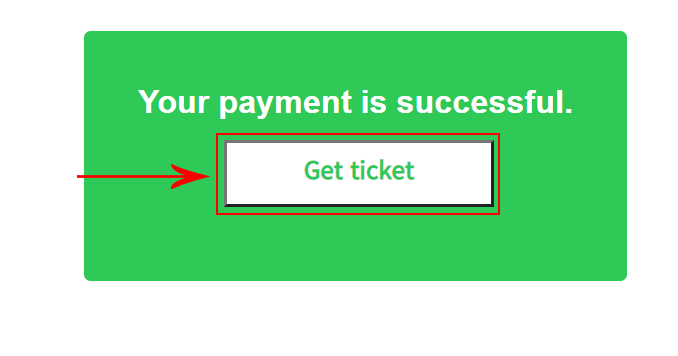
၁၀။ နောက်ဆုံးအဆင့် အနေဖြင့် မိမိ၏ လက်မှတ် ဘောင်ချာအား ရယူရန်အတွက် ပုံတွင်ပြထားသည့်အတိုင်း "Get ticket" အား နှိပ်ပေးပါ။ ဝယ်ယူမှု ပြီးဆုံးပြီ ဖြစ်ပါသည်။
10. For the last step, please click "Get ticket" as shown in figure below to get your ticket voucher. Then your payment is finish successfully.
အထက်ပါ အဆင့်များသည် Elite Express Website မှတစ်ဆင့် ဝယ်ယူသူများအတွက်သာ ရည်ရွယ်ပါသည်။ Website အား အသုံးမပြုပဲ OnePay application မှလည်း Elite ကားလက်မှတ်များအား တိုက်ရိုက် ဝယ်ယူရရှိနိုင်ပါသည်။
The upper steps aimed only for the customer who purchase via Elite Express Website. Elite Express tickets can purchase directly from the OnePay application without using Website.